File Level Restore
Categories: Backup, Restore, XenServer, Hyper-V, Physical Systems, Alike v3, Alike v4
Introduction

In Alike v3.0 and up, you can more conveniently mount protected volumes nearly instantly to browse and retrieve individual files or folders using Alike’s File Level Restore (FLR) function. FLR is extremely helpful when you want to restore a version of a single file that has been deleted or you need information from a previous version of that file.
Restoring an entire virtual machine with the previous version of that file can be very time-consuming. By using FLR, restored drives will temporarily be assigned drive letters on the Alike system itself, allowing you to browse and copy any files and folders for restoration. FLR in Alike also allows you to use third-party tools to restore Exchange database files.
Running an FLR job in Alike v4.x* is easy with Alike’s web-based UI. This KB article will take you through the process step by step.
How to Run an FLR Job in Alike v4
- Find the protected system you want to restore by navigating to Systems–>Protected Systems.
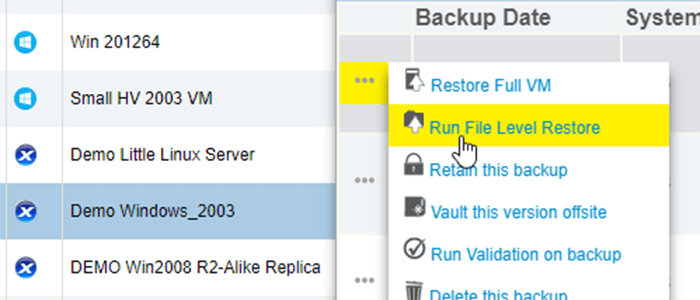
- Click on the system and hover over the menu to the left of the file you want to restore.
- The second menu item gives you the option to “Run File Level Restore” (as shown in the image above).
- Once you click on that to start the job, go to Jobs–>Running Jobs and locate the FLR job for that system.
- Click on that job to see the job’s progress in the “Active Jobs” window, and wait for it to complete.
Once the FLR job is complete, please complete the following steps:
- Locale the “File share is available at:” line in the “Active Jobs” window.
- Copy the file share listed and navigate to that share.
- You will find the restored files in the folder in that location.
- Once you’ve recoverd your files, go back to the “Active Jobs” window to end the FLR job.
Watch this short video tutorial for a demonstration of the steps listed above.
Final Notes
*Upgrade Note: The instructions and video tutorial in this KB article only apply to Alike v4.0 and up. Below you’ll find more information about FLR in Alike v3.x.
FLR in Alike v3.x
Before Alike 3.0.0, FLR was achieved by using our Alike Backup Delegate (ABD), which exposed a CIFS share of files.
After upgrading to Alike 3.0, you may need to reboot your machine in order for the driver to load. Certain versions of Alike 3.0 had issues with properly registering the driver with Windows. If you have upgraded from 3.0.0 to 3.0.1, and file-level restore does not work, you may need to check the following common issues:
- Check your Windows registry by running “run”->regedit. Under SYSTEM->CurrentControlSet->Services, there should be a hive for “flrdriver.” If there is also a hive for “flrdriver.sys,” delete it.
- Check your C:\windows\SysWow64\drivers directory. If there is a file named “flrdriver.sys” located here, please delete it.
- After conducting these changes, reboot your system.
