
How to Set Up a Local ADS
Categories: ADS, Backup Storage, Local Authentication, Security, CIFS/SMB Permissions, Alike v4
Introduction
Setting up a local ADS (Alike Data Store) to Alike is not much different from using a remote ADS: the biggest difference is one must utilize an extra option that supplies the local path to the ADS. All the other steps leading up to that point are the same.
Setting Up a Local ADS in Alike
For any ADS, we strongly recommend the use of local accounts for authentication. Unlike Domain authentication, local authentication does not rely on the Active Directory, FQDNs, or other managed resources. Using local accounts is the easiest and most efficient way to authenticate for ADS use.
First, choose the account you wish to use to authenticate to the local ADS / ADS share. The Best Practice is to utilize a local user account to the host machine. An easy option would be to create a new, local account named “Alike” or “Backup” for this purpose, or any account name that would not be easily mistaken.
When the account is configured, the next step is to create the local ADS directory and share. Using File Explorer on the host machine, navigate to the directory where you wish to create your share, and create a new directory. The name can be anything you wish, but as mentioned before, we suggest something akin to “Alike,” “Backup,” or even just “ADS” so that the directory is not easily mistaken.
Once created, right click your share and go to “Properties” then “Security.” Click “Edit,” then “Add…” In the search field, type in the user account you created earlier and click “Check Names” and “OK.” Give this account “Full Control” then click “Apply.” This accomplishes local (NTFS) permissions.
Now you will need to configure the remote share (CIFS/SMB) permissions. To do this, go over to the “Sharing” tab, right next to “Security,” then click “Advanced Sharing…” Click “Share this folder” and set your share name to: QSDS. Click “Permissions” to apply and then “Add.”
In the search field, type in the user account you created earlier and click “Check Names” and “OK.” Give this account “Full Control” and then click “Apply.” Now you’ve got both NTFS and CIFS/SMB permissions configured. You can now use this ADS with an Alike server.
If this is a new install of Alike, follow the First Time Setup wizard. When you are asked to supply an ADS (first step after the Welcome screen), click “Browse” and navigate to the ADS share you created earlier. You’ll receive the option to “Create Share.” Click this, and Alike will pipe in an account to that shares permissions. Click “Next” and continue on with the wizard.
If this is an existing Alike install, you can now choose to migrate your current ADS over or start a new one. Before you begin, you’ll need to stop the Alike services. Then, to migrate your ADS over to a new location, copy the entire existing ADS from the “data” directory over to the new share.
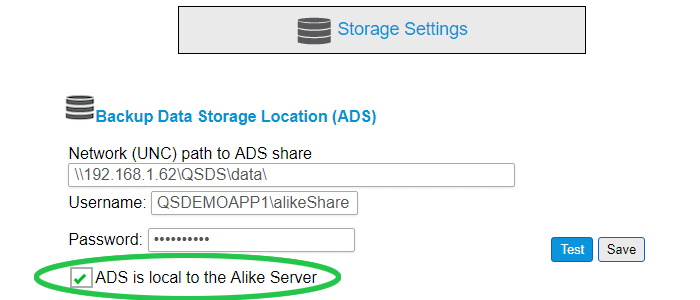
Once the transfer is complete, or if you’re creating a new, blank ADS, return to the Alike UI, Tools –> Settings. Under “Backup Data Storage Location (ADS),” first, supply the ADS UNC path in the “Network (UNC) path to ADS share” field, which should be: \\your.alike.server.ip\QSDS. Below this, enter in the local user account we created earlier. Then, click the option “ADS is local to the Alike Server” (see image at top).
Below this you’ll have another field to input the local path to the ADS share. Click “Test” and if all the steps were followed correctly, you will get a Green status message either indicating it found the new ADS or that it’s generating a BLANK ADS. Click “Save” and you can now turn the services on.
Final Notes
If you’ve completed all the steps in this KB, your local ADS should be setup and ready to go. We recommend running either an ABD Diagnostic Job or a small backup job to ensure everything links up as planned before leaving the server to the scheduled jobs.